

How To Build A Decorative Wooden Matchbox


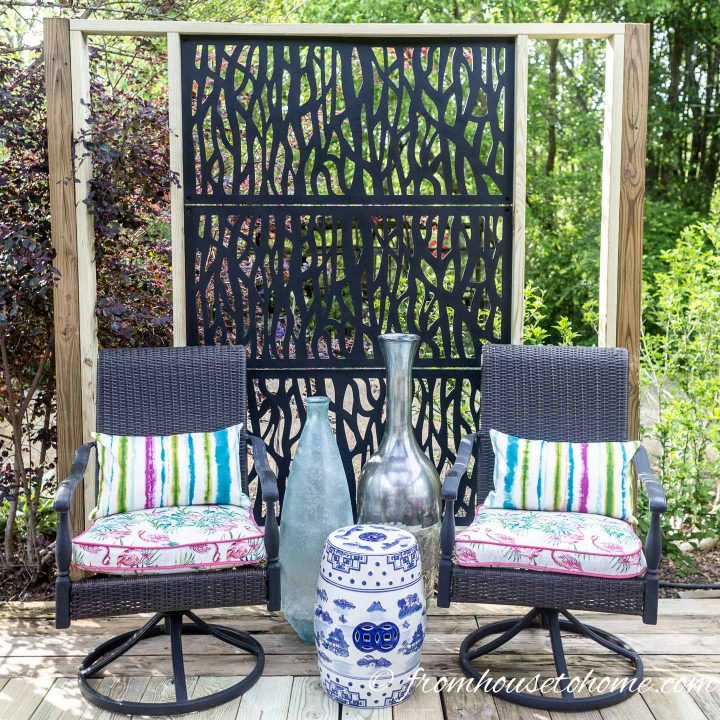


Whether you lot desire to add together some privacy to your deck, would like to create a hole-and-corner garden in your grand or are simply looking for a creative fashion to add art to your garden, this decorative DIY outdoor privacy screen may exist exactly what you need. Information technology's piece of cake to build and creates a beautiful backdrop for your outdoor infinite.
Decorative DIY Outdoor Privacy Screen
This mail may contain affiliate links. We make a small commission if yous purchase the products from these links (at no extra toll to you). As an Amazon Associate, I earn from qualifying purchases. But nosotros but recommend products nosotros would utilise ourselves. For more data, click here to see our disclosures.
Every bit part of my deck makeover, I wanted to add a screen to the dorsum of my deck. In my case, information technology'south non so much for privacy, but to create more than of the feeling of a surreptitious garden room. (However, if they ever build something on the land backside my firm, I'll be happy to have my deck privacy screen).
Since you can run across information technology easily from the windows in the house, the screen definitely needed to be decorative. And I also wanted it to forbid people from accidentally falling off the side of the deck if they backed a chair up likewise far. It's merely a 6-inch driblet merely still…
Originally, I was looking for some kind of large wrought fe art piece that I could hang at that place. But trying to find one that I liked and was big enough for the space was hard to do.
So I decided to build a lattice screen. Not quite as interesting, but I could hang some garden art on it to add some extra flair.
Then I discovered the perfect combination of deck privacy lattice and art…these decorative privacy screen panels.
With a few boards to make a frame, this decorative DIY outdoor privacy screen was really easy to make and looks swell on my deck.
Supplies
Materials
- 2 – 10′ x four″ x 4″ posts. If you live in an area with very cold winters, yous may demand to become 12′ posts so you can bury the ends far enough down to go below the frost line.
- 6 – 8′ ten 2″ x iv″ boards
- 2 – viii′ 10 ane″ x 2″ boards
- iii decorative privacy screen panels*
- 1 package of 3/4″ blackness screws*
- 1 parcel of 2 1/two″ deck screws
- gravel
- cement (optional)
Tools
- Saw for cutting the boards (I used a miter saw merely you can use any kind of saw that will cut through the boards)
- Cordless drill
- Corner clamp*
- Clamps
- Reciprocating saw
- Post hole digger*
- Level
How To Build Your Deck Privacy Screen
Now, before we start, let me say that I was doing this by myself.
This would be much easier to install with two people, so I suggest finding someone to help you if y'all can (at to the lowest degree for the part where you lot are putting it up).
I will show you the fashion that I did it, and so tell you how I would have done it if I had help 🙂
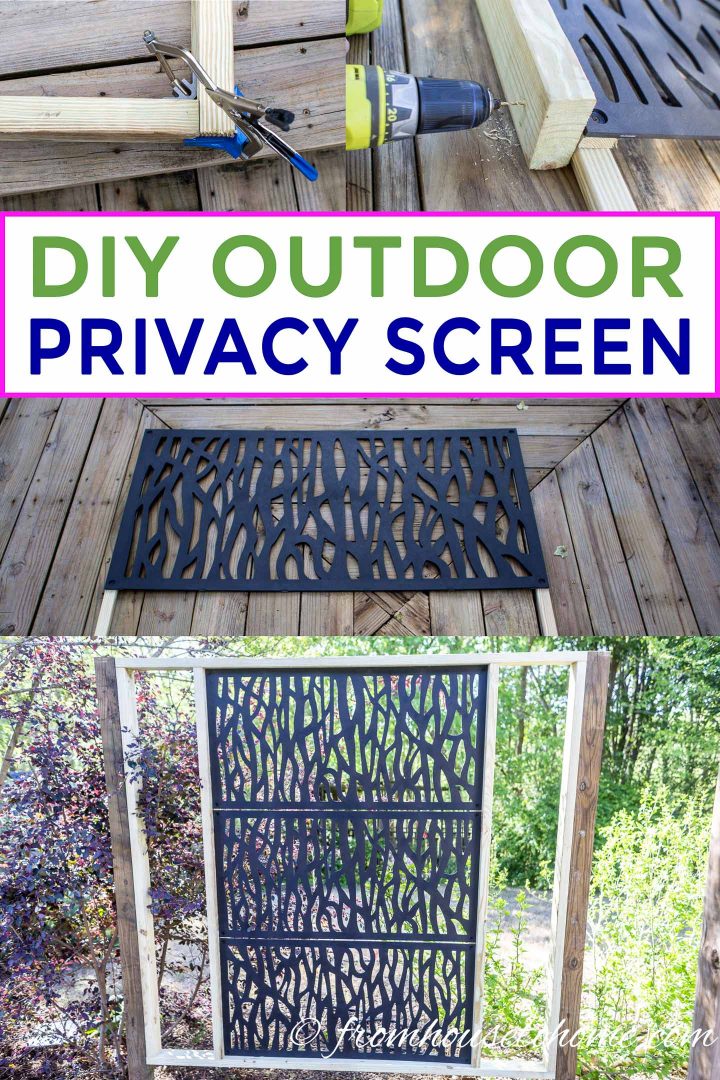
Step one | Cut The Wood
For my DIY garden privacy screen, I used pressure treated forest. Information technology's the to the lowest degree expensive option and that's what my deck is made from.
Yet, yous tin apply cedar, redwood or any other type of wood that does well outdoors.
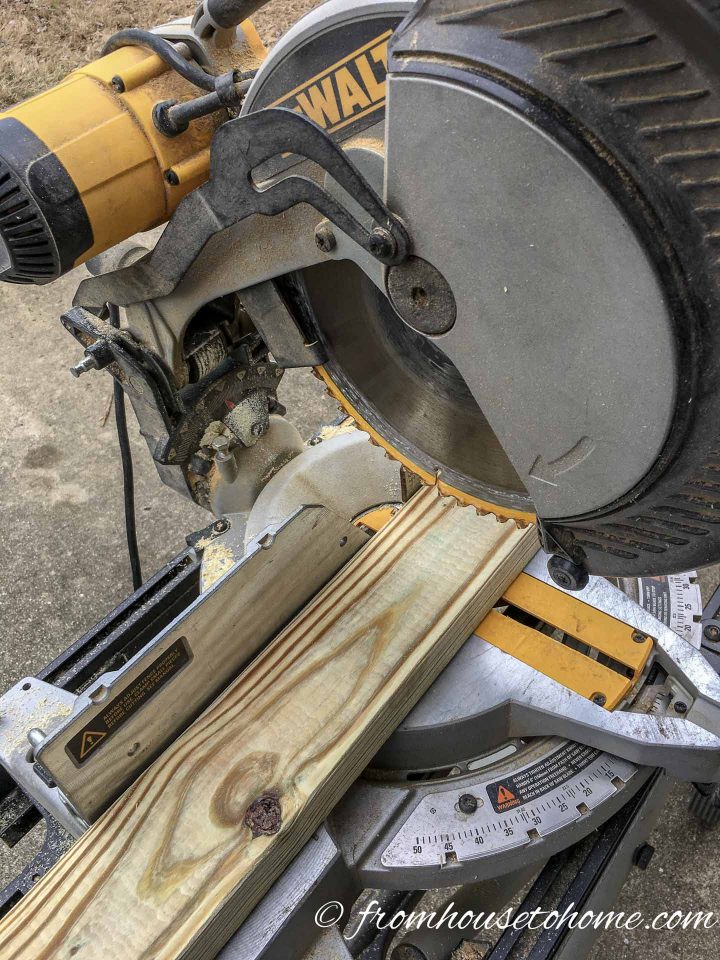
1. Cut four of the ii″ x four″ boards to 6 feet long. I used a miter saw for this but any saw that will cutting through 2″ x 4″ boards volition work.
two. Cut two of the two″ ten 4″ boards to half-dozen anxiety 6 inches long.
3. Cut the 1″ ten ii″ boards to 6 feet long.
Construction Tip
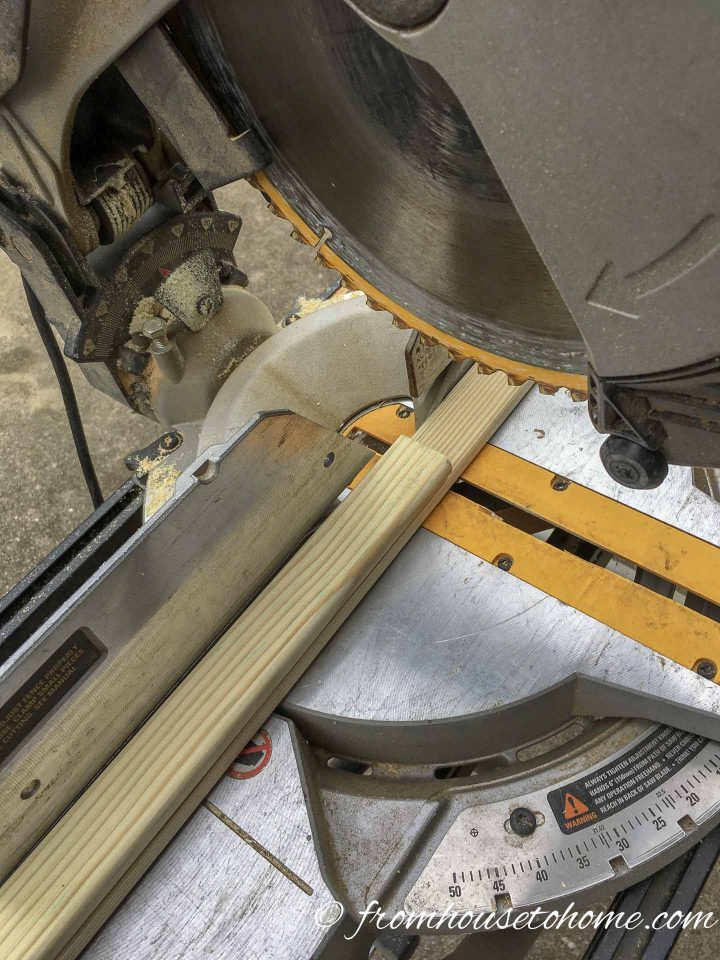
When I have to cut multiple boards the same length, I ordinarily take the like shooting fish in a barrel way out. Mensurate the first one carefully and cutting it.
Then employ that board every bit the measuring stick for all of the others. Just make sure that the ends line up properly to get the right measurement.
Footstep 2 | Put Up The Posts
The adjacent step in building your decorative DIY outdoor privacy screen is to put up the posts that volition hold up your panel.
The screen volition exist about vi anxiety half-dozen inches wide when it is washed, so your holes will demand to exist that far apart.
1. Figure out where the posts volition go. Since I was putting mine behind the gazebo, I wanted to brand sure that the screen would be centered across the dorsum of the deck.
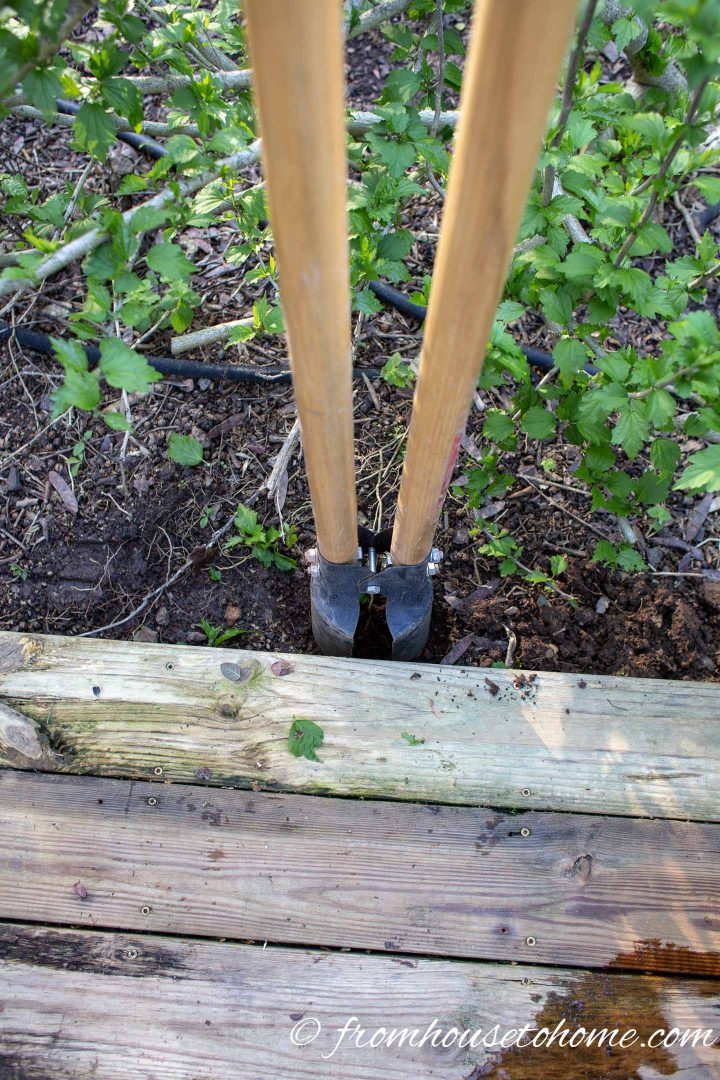
2. Then dig the holes for the posts.
To make certain that the posts are sturdy and won't autumn over, I dug holes that are almost 2 feet deep using my post hole digger*. (You definitely don't need to go to the gym on the day you do this!)
Since I live in South Carolina where nosotros don't actually accept a frost line in the wintertime, two feet is far enough. Withal, if you live farther north, your holes will probable need to be deeper to make sure they don't shift in the winter. (As an example, when I lived in Toronto, we used to bury posts 4 anxiety deep). I would use whatever the recommendations are for fence posts in your area.
3. To let water to drain, adding a couple of inches of gravel to the bottom of the hole is a proficient idea.
4. Then put your posts into the holes and measure out the distance between them to make certain your screen will fit. It should be about half dozen feet 6 inches broad.
Don't worry that your posts aren't straight at this point…we'll ready that later.
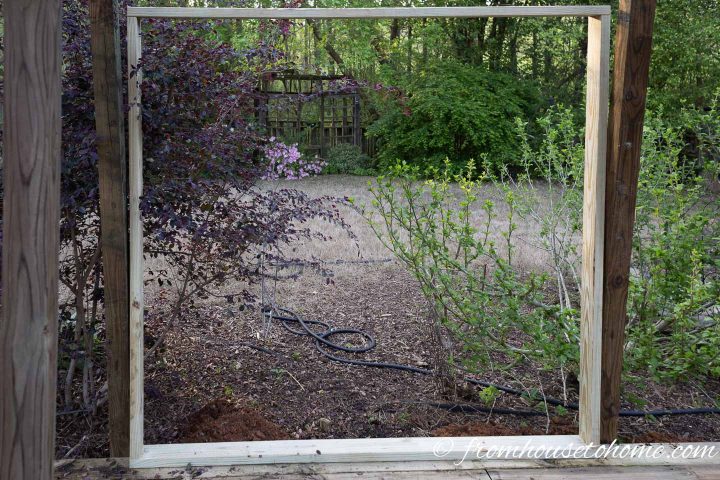
Step three | Build The Privacy Screen Outer Frame

Before I start building anything, I like to lay out my boards to make sure everything fits. So the finished decorative DIY outdoor privacy screen will expect similar this.
The top and bottom are the 6 foot 6 inch 2″ x 4″ boards, and the sides are the 6 foot two″ x four″ boards.
Now that nosotros know we measured and cut everything properly, we'll put together the privacy screen outer frame.
Make sure that the top and bottom boards are existence attached to the meridian and bottom ends of the side boards. Otherwise your frame will be too curt to fit the panels.

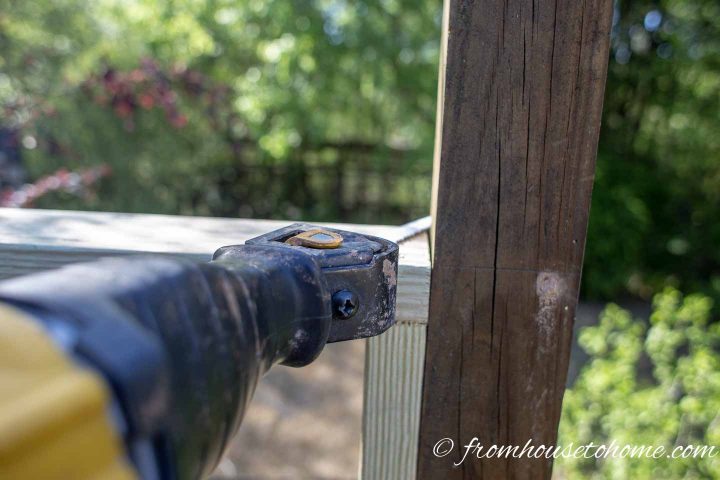
one. Butt the bottom board tightly to the bottom of ane of the side boards and use the corner brace to make sure they are square.
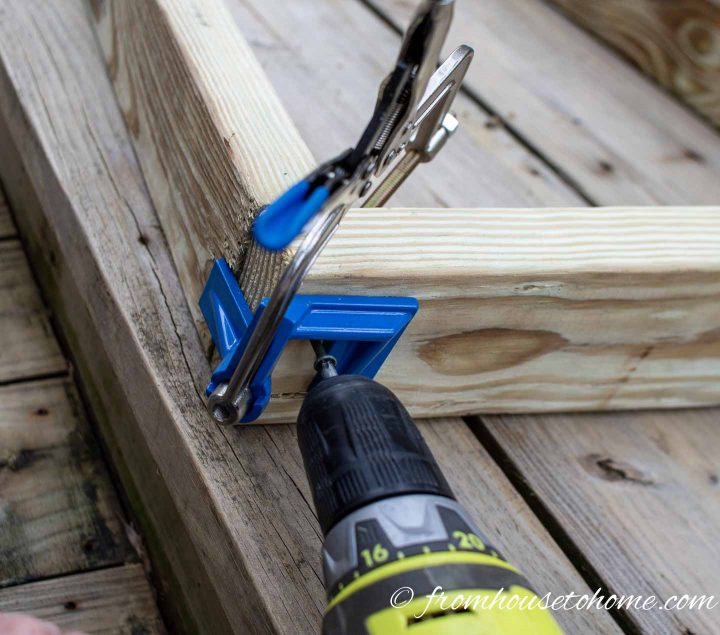
2. And so use ii one/ii″ deck screws to screw the boards together. The corner brace has spaces left open up so in that location is room for the screws to get in.
I used iii screws at each corner to brand sure the joints were not wobbling.
3. Repeat this procedure for all four corners.
Pace 4 | Join The Privacy Screen Decorative Panels
Next, nosotros're going to create the decorative screen from the lattice panels.
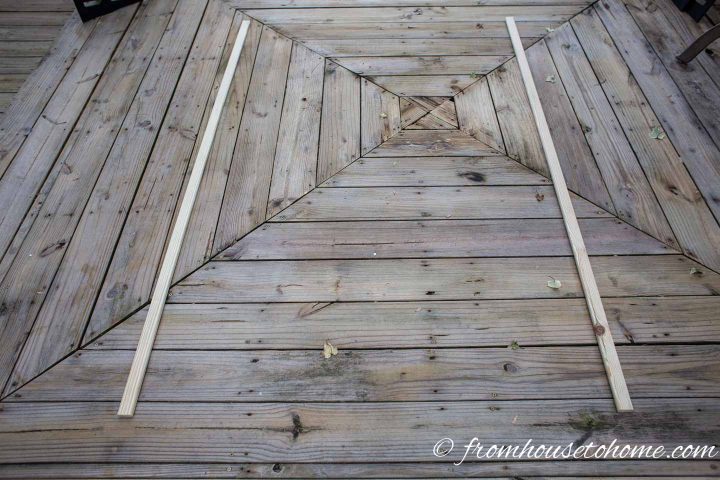
1. Lay down the two 1″ ten ii″ boards so that they are parallel to each other and near 4 feet apart.
2. Then line up the height of the first console with the top of the ane″ x 2″ boards.
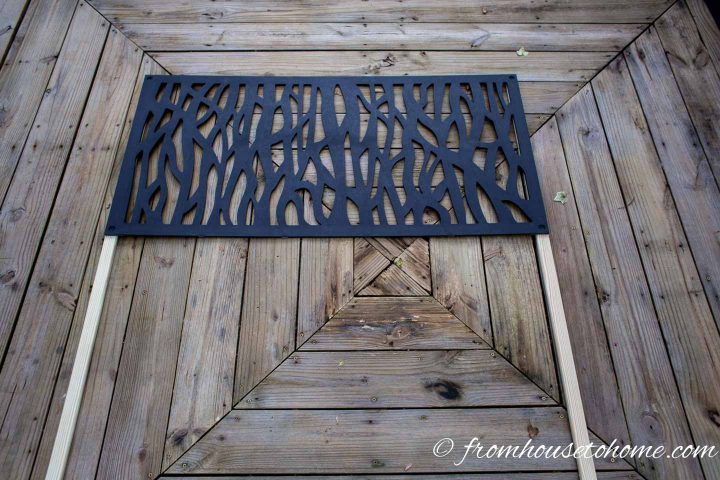
3. Use black screws to screw the decorative panel to the i″ x two″ boards.
At that place are pre-marked holes in all 4 corners so it'south easy to know where to attach them.
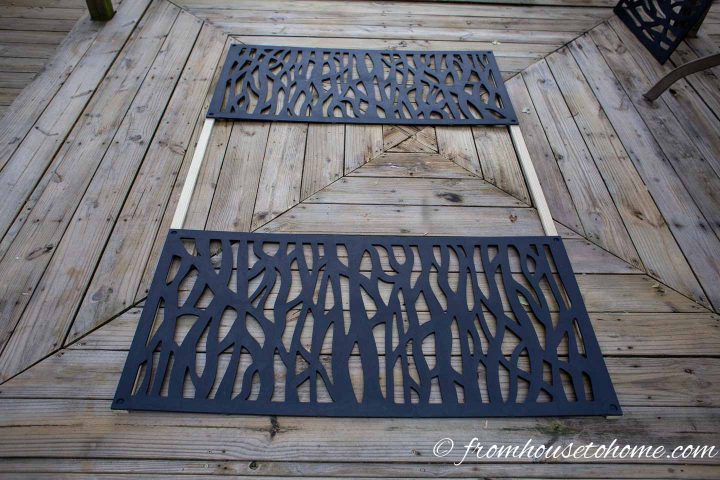
iv. Line upward the bottom of the next console with the bottom of the 1″ x ii″ boards. Bring together the console to the boards using blackness screws.
5. Add the last panel in the middle of the peak and bottom ones, making sure information technology is centered between them. Attach the middle panel to the boards using the blackness screws.
Step 5 | Build the Privacy Screen Inner Frame
Now we're going to attach the other pair of 2″ x 4″ boards to the sides of the decorative panel.
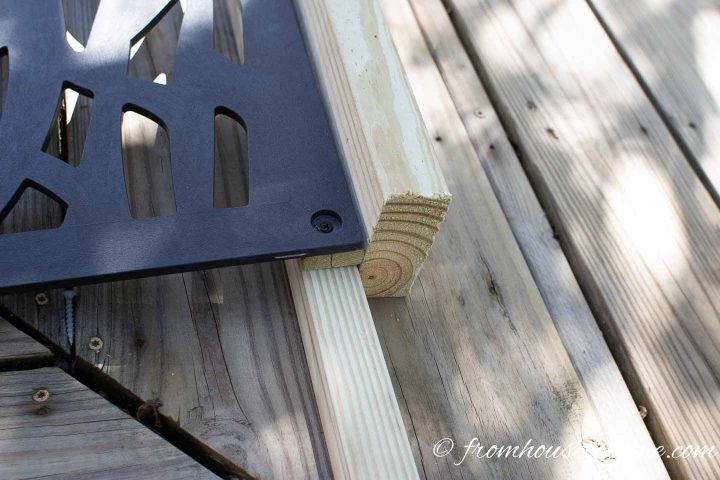
1. To get the panel to be centered in the middle of the 2″ x 4″ boards, put 2 bit 1″ ten 2″ boards nether the console.
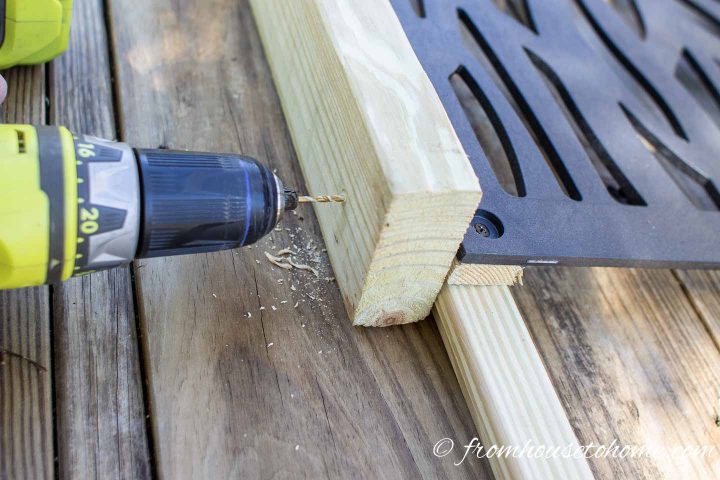
2. Use deck screws to adhere the 2″ x 4″ boards to the 1″ x two″ board that is attached to the lattice panel. Pre-drilling the holes with a small drill chip helps to foreclose the wood from splitting.
Structure Tip
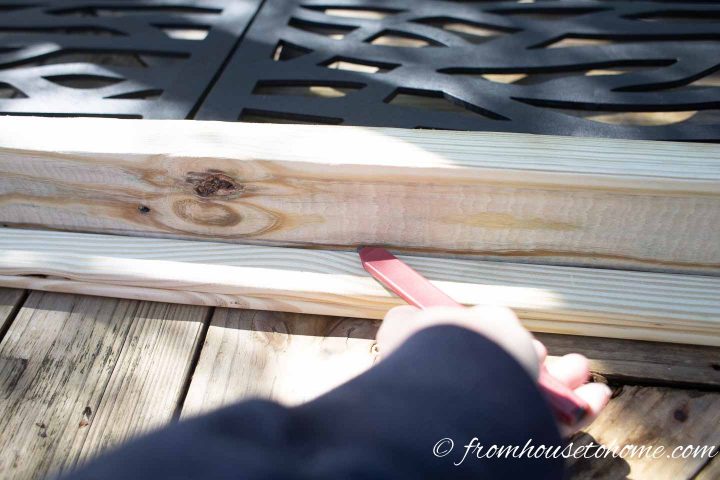
I usually eyeball where the holes demand to be drilled. But if you lot want to have a more than accurate approach, stack up a couple of 1″ ten 2″ boards beside the 2″ x four″ and describe a line beyond the acme of them. Then drill your holes simply above the line.
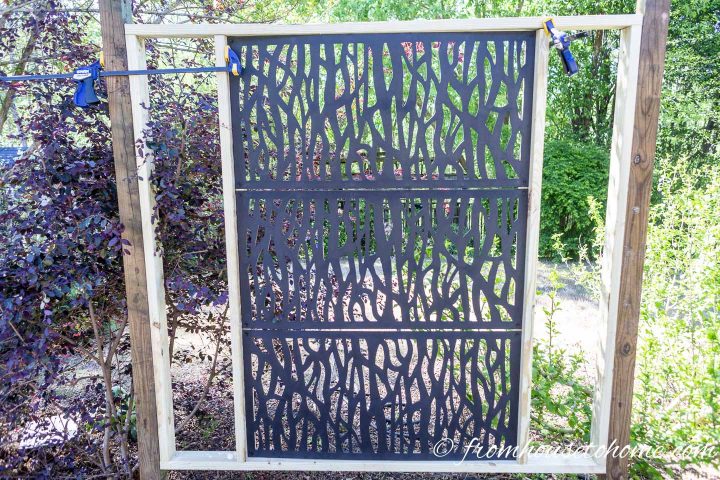
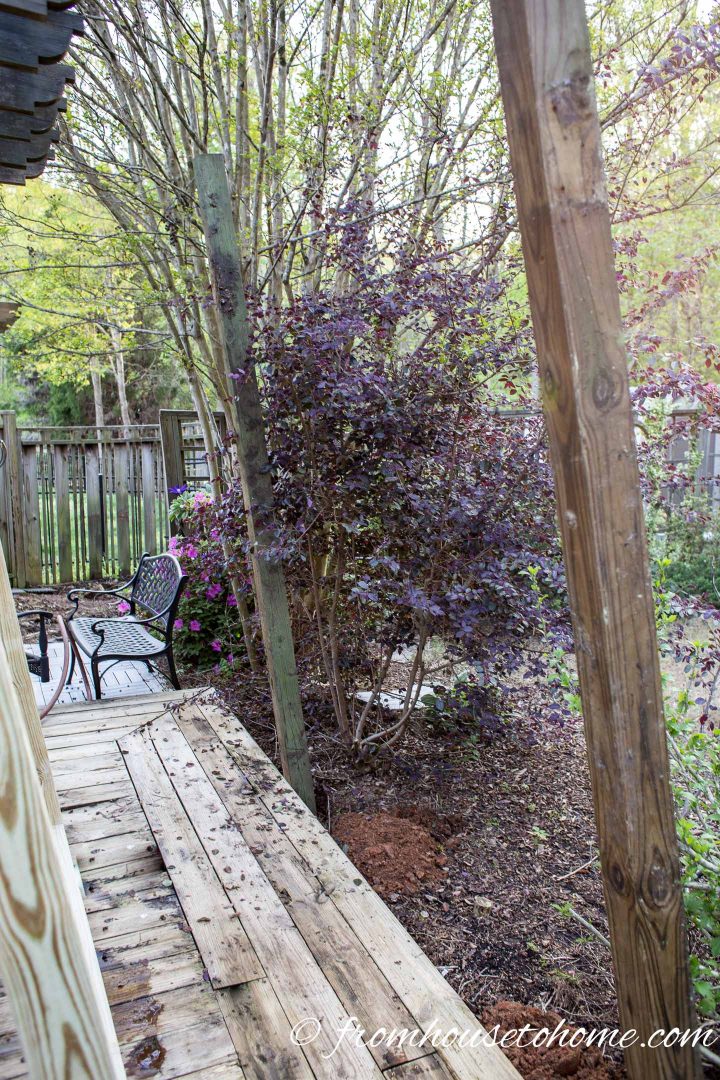
Step 6 | Adhere the Outer Frame To The Posts
This is the office that I would do in a dissimilar guild if I had a helper.
I thought the weight of the whole screen put together would exist too heavy for me to lift and go along direct while I was attaching it to the posts.
So I decided to adhere the outer frame to the posts first, and then install the decorative panels.
However, if I had help, I would bandy stride vii and stride 6. Information technology would exist easier to install the decorative panels in the outer frame while it was on the ground rather than doing it once the frame was attached to the posts.
1. Move the privacy screen frame and then that it is centered between the posts.
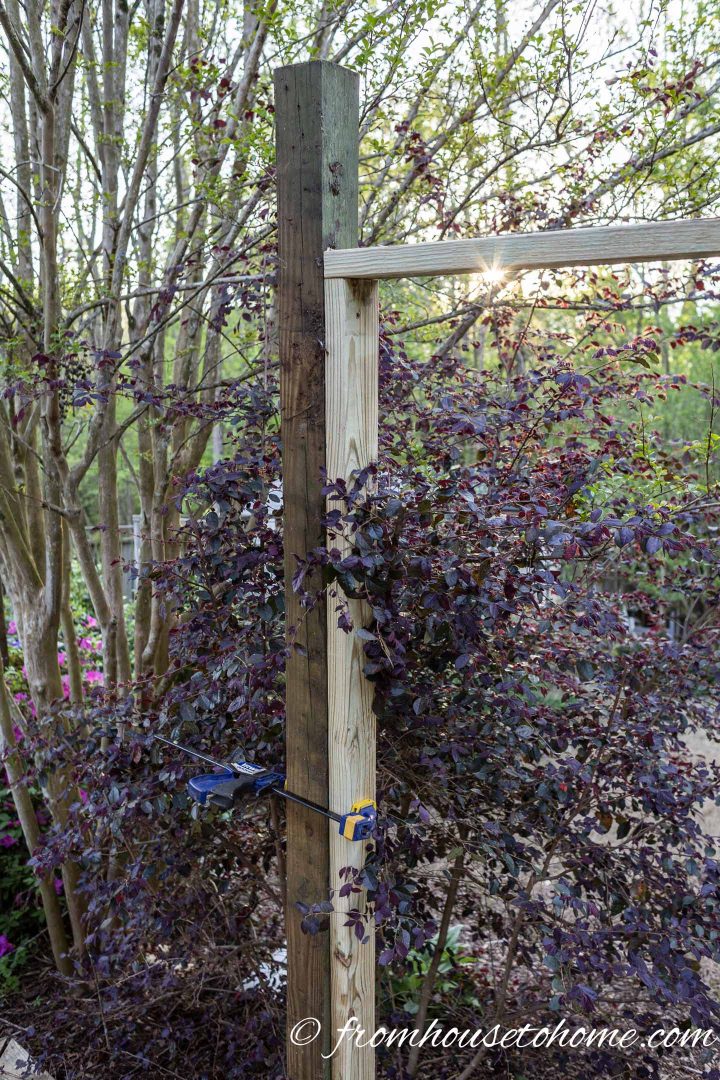
2. Raise 1 side of it to the desired height. Mine is about i pes off the ground. Then secure it to the post using a clamp.
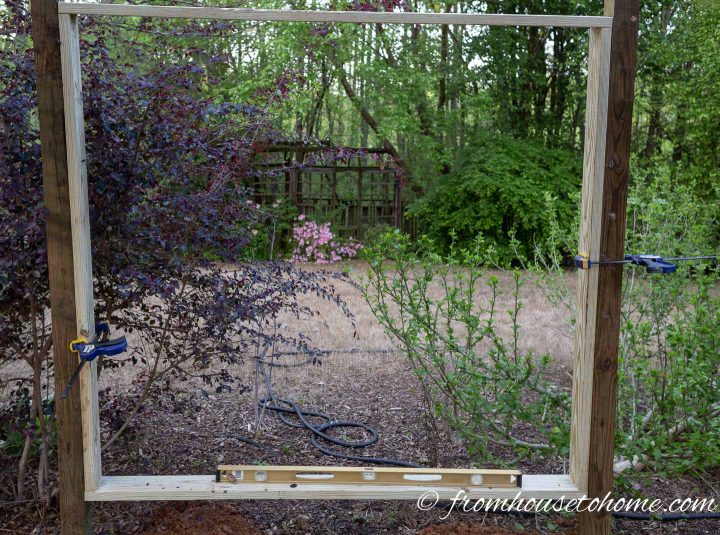
three. Raise the other side of the frame to the desired acme and use a level to make sure the bottom rail is straight.
4. So attach the frame to the posts using deck screws. Make certain that the sides of the frame are lining up with the sides of the posts.
Double-bank check that your frame is withal level.
Construction Tip
If you are having trouble getting the frame to line upwardly with the posts, use a clamp placed across both boards (similar the one on the bottom in the moving picture) to strength the edges together.
Step 7 | Install The Decorative Panels
1. Heart the privacy screen panel in the middle of the frame. There should be almost 12″ on each side.
I used clamps to assist proceed everything in place.
2. Screw through the tiptop board into both of the inner frame two″ x 4″ boards using deck screws.
three. Practise the same for the lesser lath.
You should now have a free-standing decorative privacy screen.
Step eight | The Finishing Touches
Once your decorative DIY outdoor privacy screen is up, use the level to brand certain that the posts are standing straight up.
And then fill in the holes.
This is once when living in an area with soil that is almost all clay is a do good.
I can fill the holes back up with the dirt I dug up and that post isn't going anywhere.
Notwithstanding, if yous alive somewhere that has more sandy soil, you will probably want to mix up some cement to fill up the holes with. Otherwise your screen may not be as sturdy as you want it to exist.
Finally, cut off the posts so they are fifty-fifty with the meridian of the privacy screen frame.
A reciprocating saw with a long blade is the easiest way to practise this.

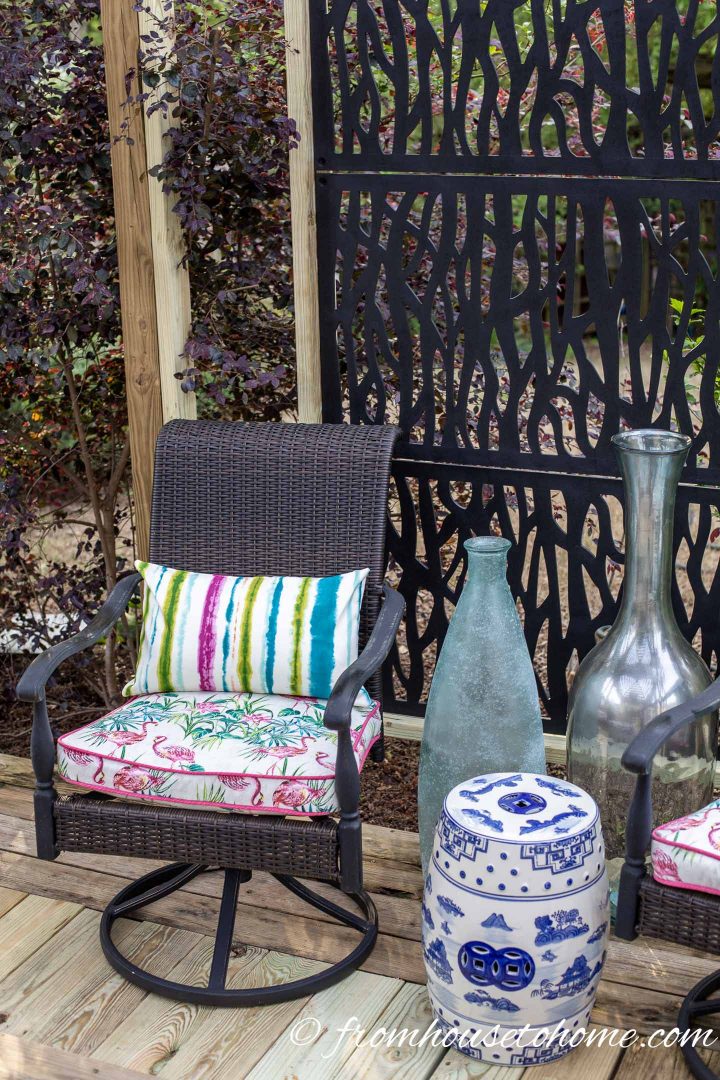
And then your decorative DIY outdoor privacy screen is done!
Add some comfy chairs and enjoy your deck.
Other Gardening Ideas You Might Like
- Backyard privacy ideas
- DIY backyard projects
- Shade solutions for your deck
Pivot Information technology So Y'all Don't Forget Information technology!
Take comments or questions nearly our decorative DIY outdoor privacy screen? Tell united states in the section beneath.
Source: https://www.gardenersoasis.com/decorative-diy-outdoor-privacy-screen/
Posted by: mayprefte1960.blogspot.com
0 Response to "How To Build A Decorative Wooden Matchbox"
Post a Comment